Archive for the ‘Uncategorized’ Category.
September 23, 2023, 8:51 am
Introduction
The WooCommerce Consumer Key and Secret enable external application to communicate with your WooCommerce store. The key and secret are an essential for authenticating requests to your WooCommerce store’s REST API.
Step by Step Guide
To obtain the consumer_key and consumer_secret for your WooCommerce store, you’ll need to create a set of API credentials. Here’s how you can do it:
- Access Your WooCommerce Dashboard: Log in to your WordPress admin dashboard where WooCommerce is installed.
- Navigate to WooCommerce Settings: In your WordPress admin, go to WooCommerce settings. You can usually find this under the WooCommerce tab in your WordPress sidebar.
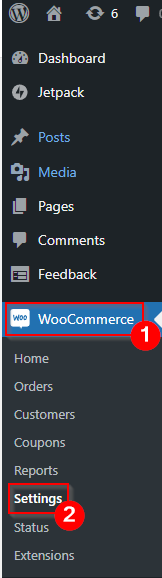
- Go to the Advanced Tab: In the WooCommerce settings, click on the Advanced tab.

- Enable the REST API: Scroll down to the “REST API” section and make sure it’s enabled. If it’s not enabled, click the checkbox to enable it.
- Create a New API Key: After enabling the REST API, you will see a new section called “REST API.” Click on it.

- Add a New Key: Click Add Key button.

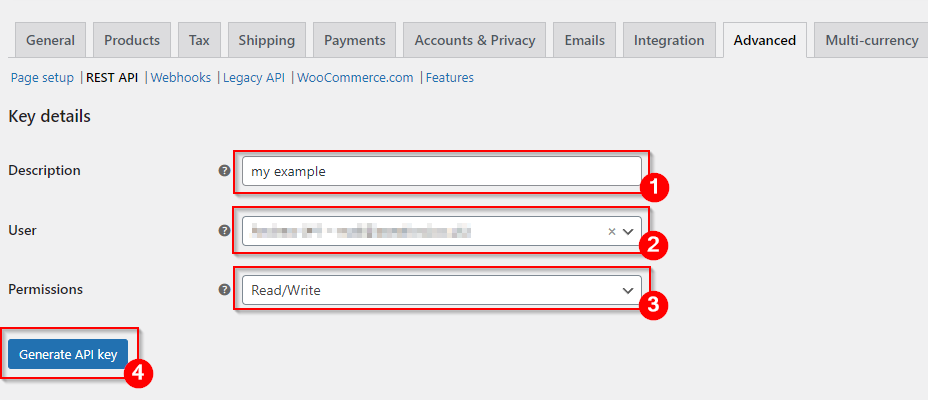
- Configure Your Key:
- Description: Give your key a name or description so you can recognize it later.
- User: Select your WordPress user account.
- Permissions: Choose the level of permissions you want for this API key. For API requests like creating products, “Read/Write” permissions are typically needed.
- Generate Key: After configuring the key details, click on “Generate API Key.”
- View Your Credentials: Once the key is generated, you will see your
consumer_key and consumer_secret. These are the credentials you will use in your Python script to authenticate with the WooCommerce REST API.Important: Make sure to copy and save your consumer_key and consumer_secret in a secure location. You won’t be able to view the consumer_secret again, so if you lose it, you’ll need to regenerate the API key.
Summary
Once you have your consumer_key and consumer_secret, you can use them in your external applications to make authenticated requests to your WooCommerce store’s REST API.
May 11, 2023, 11:18 pm
Introduction
In this article, we are going to create a Docker Image from an Inno Installer. The installer will install a .net 4.8 framework console application into the docker image.
Typically, when building docker images you should try to build the image from the source code but in the real world this is not always possible and in this article, we will assume that you do not have access to the source code for the installer or the console application that this being installed.
We will be using an installer called mysetup.exe, which installs an application called HelloWorldConsole.exe to the folder c:\program files (x86)\My Program\.
Containerize Procedure
In this procedure, we are going to create a Docker Image that will execute the installer and configure the container to run the application HelloWorldConsole.exe on startup.
- In the same folder as the installer mysetup.exe create a text file called Dockerfile.
- Using a text editor add the following code to the Dockerfile.
FROM mcr.microsoft.com/dotnet/framework/runtime:4.8
WORKDIR /app
COPY mysetup.exe
RUN mysetup.exe /VERYSILENT
ENTRYPOINT ["/program files (x86)/My Program/HelloWorldConsole.exe"]
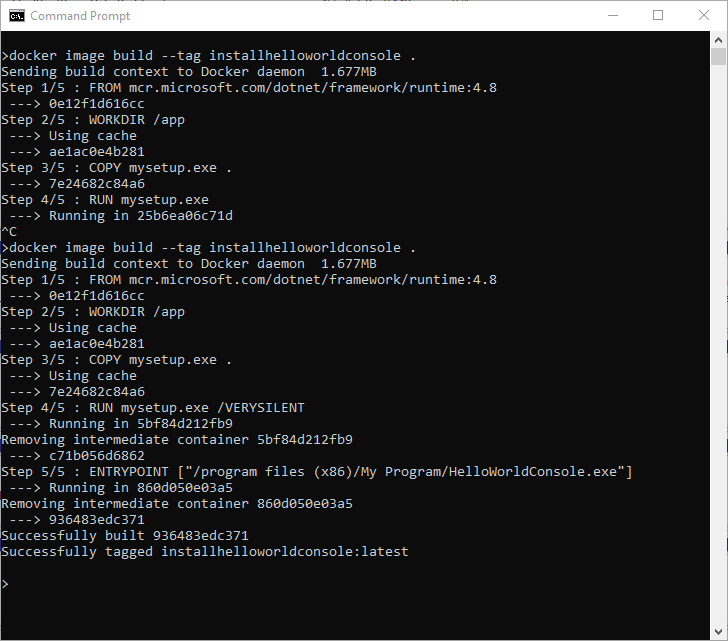
- Open the command prompt and navigate to the folder containing the Dockerfile and execute the command to create the docker image. The command will create a new docker image called installhelloworldconsole.
docker image build --tag installhelloworldconsole .
- To create a container using the image run the command docker run. This command will create a container using the image created in the previous step and call the container hello2.
docker run --name hello2 installhelloworldconsole
- After the container has booted, the container will execute the program c:\program files (x86)\My Program\HelloWorldConsole.exe

- You can confirm the program has been executed by checking the docker logs using the command docker logs and the name of the container.
docker logs hello2

Summary
In this article, we create a docker container using a pre-existing installer.
May 1, 2019, 8:28 pm
To install the openssh-server package run the command below in console.
sudo apt-get install openssh-server
Once installed, the SSH service should start automatically. If necessary, you can start the service using the command.
sudo service ssh start
February 4, 2017, 5:38 pm
 We used WIFI to control our 2015 Pi Wars robot. Using WIFI was a big mistake. On the day of the competition, there was too much interference and lag. We have learnt from our mistakes. This time we will be using Bluetooth.
We have connected a USB Bluetooth dongle to the Raspberry Pi and using the instructions below connected a Sony Playstation Six Axis Controller.
- Using micro usb cable plug in the PS3 controller into the raspberry pi
- Enter the command
sudo ./sixpair
- Disconnect USB cable from PS3 controller
- Enter the command
bluetoothctl
- Enter the command
devices
- Enter the command
agenton
- Enter the command trust followed by the MAC address of the controller. In my case the MAC address is 00:06:F5:C4:01:3b.
trust 00:06:F5:C4:01:3b
- Disconnect the usb cable
- Press the PS button the top of the controller
- Confirm the new input device has been succesffully added. Enter the command
sudo ls /dev/input you should see JS0 has been added to the list of input devices
December 14, 2015, 9:45 pm
|
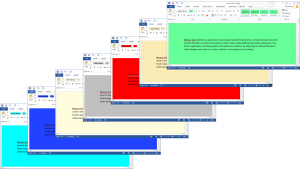
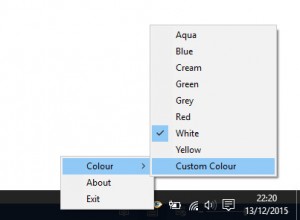
Meares-Irlen Syndrome, (also known as Scotopic Sensitivity Syndrome or Visual Stress) is the term used to describe a number of symptoms which make reading difficult and often unpleasant. The Oculus application helps people, both adults and children, by adjusting the default Window’s white background colour to a colour which is more pleasant for reading.
|
|
|
Oculus is easy to use program with eight predefined colours and a colour picker which will allow you to pick any one of 16 million colours.
Oculus is compatible with the following programs on Windows 7 and Windows 10
- MicroSoft Word
- MicroSoft Excel
- MicroSoft Outlook
- Notepad
- Wordpad
|
|
|
Related Links
http://www.colour2c.co.ukThe Dyslexia and Coloured Filter Service works in North Yorkshire Schools assessing pupils for Meares-Irlen Syndrome and prescribing coloured overlays.
|
July 25, 2014, 4:17 pm
Test if two values are almost equal.
///
/// Test if two doubles are approximately equal
///
/// Test variable one
/// Test variable two
/// epsilon a measure of equality
/// boolean true = values are approximately equal, false = values are not equal
public static Boolean almostEqual(double a, double b, double eps)
{
    return Math.Abs(a - b) < eps;
}
Example using the function.
double a = 1.234;
double b = 1.235;
double eps = 0.01;
Console.WriteLine("equal = " + almostEqual(a, b, eps).ToString());


