In this article, we are going to create a Docker Image for a .net framework console application. The Docker Image will enable us to execute the console application within a Docker Container.
The Console Application
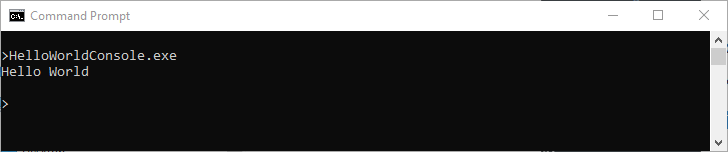
The console application that we will be using is called HelloWorldConsole.exe. When executed from the command line the application displays “Hello World”.
The application is a C# (c sharp) program that has been compiled using .net framework 4.7 and here is the source code for the application which we will be using within this article. Although in this article we will only be using the compiled application.
using System;

namespace HelloWorldConsole
{
    internal class Program
    {
        static void Main()
        {
            Console.WriteLine("Hello World");
        }
    }
}
Containerizing Procedure
In this procedure, we are going to create a Dockerfile. The file will describe how to create the Docker Image for the console application HelloWorldConsole.exe.
In the same directory as the HelloWorldConsole.exe application create a text file called Dockerfile no extension.
Using a text editor add the following code to the Dockerfile FROM mcr.microsoft.com/dotnet/framework/runtime:4.8 WORKDIR /app COPY . . ENTRYPOINT ["/app/HelloWorldConsole.exe"]
Open a command prompt and change the directory to the folder containing the Dockerfile
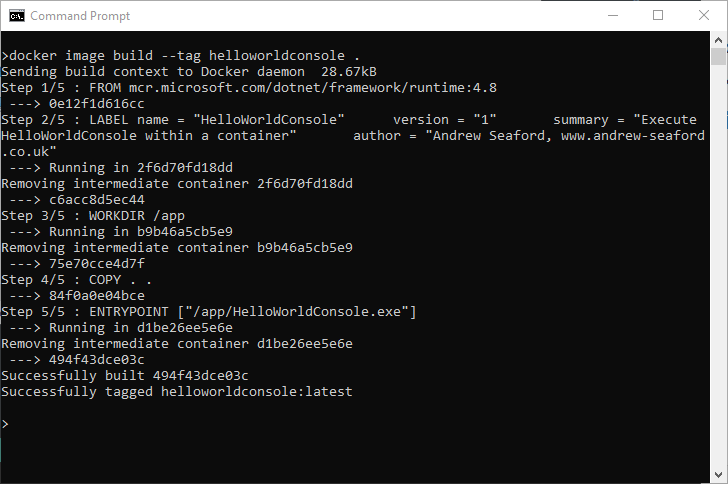
Execute the docker command to build the image file. The command will create a new docker image called helloworldconsole. Docker image names are all lowercase. The full stop (period) at the end of the command is very important as this informs the command to look for the Dockerfile in the current working directory.
docker image build --tag helloworldconsole .
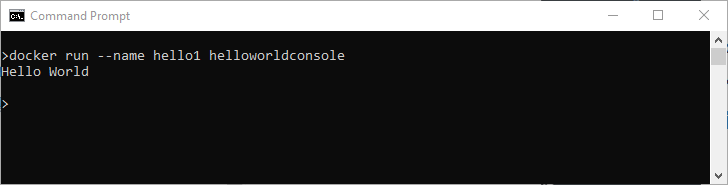
Execute the docker command to run the container using the image built in the previous step. The name argument will give set the container name to hello1 and helloworldconsole is the name of the image that will be used to create the container.
docker run --name hello1 helloworldconsole
There will be a short delay while the container boots and then the container will execute the HelloWorldConsole.exe console application.
The output from the console application will be stored in the docker logs. You can review the log messages by using the docker log command with the name of the container.
docker logs hello1
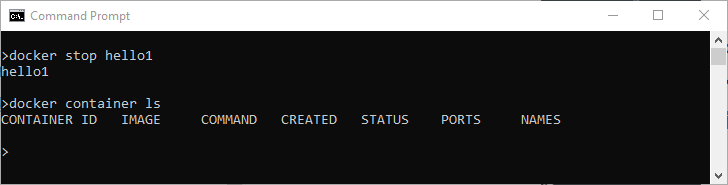
The container hello1 can be stopped using the cocker stop command with the name of the container. To confirm the container has stopped execute the command docker container ls command.
docker stop hello1
docker container ls
Summary
In this article, we created a Docker image called helloworldconsole. Then using the image helloworldconsole we created a docker container called hello1. The container executed the console application HelloWorldConsole.exe. We viewed the output of the console application using docker logs and then stopped the container using the command docker stop.
///
/// Test if two doubles are approximately equal
///
/// Test variable one
/// Test variable two
/// epsilon a measure of equality
/// boolean true = values are approximately equal, false = values are not equal
public static Boolean almostEqual(double a, double b, double eps)
{
    return Math.Abs(a - b) < eps;
}
Example using the function.
double a = 1.234;
double b = 1.235;
double eps = 0.01;
Console.WriteLine("equal = " + almostEqual(a, b, eps).ToString());
In this example I will create a C++ dll that with contain the OpenCV image processing code. I then will create a C# WPF application, within this application i will then include the dll and using the image processing function.
Create a C++ Win32 console Application, in this example it will be called ImageProcessingAgain
Click Next. Select Application type dll. Then click finish.
Click Property Manager, right click on debug, then select ‘Add Existing Property Sheet’. If you dont have a property sheet follow the following tutorial for creating The Local Method http://docs.opencv.org/doc/tutorials/introduction/windows_visual_studio_Opencv/windows_visual_studio_Opencv.html
Add the following code to the cpp
// ImageProcessAgain.cpp : Defines the exported functions for the DLL application.
//

#include "stdafx.h"

#include "opencv\cv.h"
#include "opencv\highgui.h"

extern "C"
{
	__declspec(dllexport) int exampleImageProcessing(LPCWSTR);
}

extern int __cdecl exampleImageProcessing(LPCWSTR filename)
{
	IplImage* img = cvLoadImage((char*)filename);
	return img->width;
}
build the dll project
Create a C# WPF project called UsingOpencvAgain
copy the dll and then include the dll within the C# project
Select the dll in the solution explorer, set the ‘copy to output directory’ property to ‘copy if newer’
Create two textboxes and a button
Add the following C# code to the application
using System;
using System.Collections.Generic;
using System.Linq;
using System.Text;
using System.Windows;
using System.Windows.Controls;
using System.Windows.Data;
using System.Windows.Documents;
using System.Windows.Input;
using System.Windows.Media;
using System.Windows.Media.Imaging;
using System.Windows.Navigation;
using System.Windows.Shapes;
using System.Runtime.InteropServices;

namespace UsingOpencvAgain
{
    ///
    /// Interaction logic for MainWindow.xaml
    ///
    public partial class MainWindow : Window
    {
        public MainWindow()
        {
            InitializeComponent();
        }

        [DllImport("ImageProcessAgain.dll", CallingConvention = CallingConvention.Cdecl)]
        public static extern int exampleImageProcessing(string filename);

        private void button1_Click(object sender, RoutedEventArgs e)
        {
            textBox2.Text = exampleImageProcessing(textBox1.Text).ToString();
        }
    }
}
The setName funcion demostrates simple data validation on the argument value.
void setName(string value)
{
    // validate empty
    if (string.IsNullOrWhiteSpace(value))
    {
        throw new ArgumentNullException("Please enter a value");
    }

    // validate length
    if (value.Length > 10)
    {
        throw new ArgumentException("The value is too long");
    }

    // value is valid
    MessageBox.Show("The value is valid");
}
When calling the setName function it is important that we implement code to catch any exceptions
The code below shows the short hand and long hand syntax for defining class properties.
public class Example
{
  // class property short hand
  public string Firstname {get; set;}


  // class property long hand
  private string _Lastname;
  public string Lastame
  {
     get {return _Lastname}
     set {_Lastname = value}
  }
}
The LINQ example below creates a generic collection of the class Car. Then using a LINQ statement the collection is filtered to find cars that are newer than 2009.
List myCars = new List() {
    new Car() { Make="BMW", Model="550i", Year=2009 },
    new Car() { Make="Toyota", Model="4Runner", Year=2010 },
    new Car() { Make="BMW", Model="745li", Year=2008 },
    new Car() { Make="Ford", Model="Escape", Year=2008 },
    new Car() { Make="BMW", Model="550i", Year=2010 }
};


var newCars = from c in myCars
                where c.Year > 2009
                select new { c.Model, c.Make, c.Year };

foreach (var car in newCars)
{
    Console.WriteLine("{0} {1} - {2}", car.Make, car.Model, car.Year);
}

class Car
{
   public string Make { get; set; }
   public string Model { get; set; }
   public int Year { get; set; }
}