How To Find WooCommerce Consumer Key and Secret
Introduction
The WooCommerce Consumer Key and Secret enable external application to communicate with your WooCommerce store. The key and secret are an essential for authenticating requests to your WooCommerce store’s REST API.
Step by Step Guide
To obtain the consumer_key and consumer_secret for your WooCommerce store, you’ll need to create a set of API credentials. Here’s how you can do it:
- Access Your WooCommerce Dashboard: Log in to your WordPress admin dashboard where WooCommerce is installed.
- Navigate to WooCommerce Settings: In your WordPress admin, go to WooCommerce settings. You can usually find this under the WooCommerce tab in your WordPress sidebar.
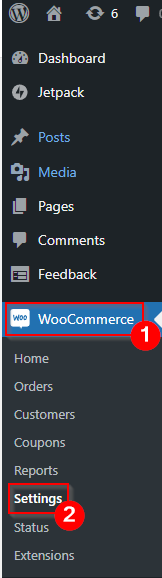
- Go to the Advanced Tab: In the WooCommerce settings, click on the Advanced tab.

- Enable the REST API: Scroll down to the “REST API” section and make sure it’s enabled. If it’s not enabled, click the checkbox to enable it.
- Create a New API Key: After enabling the REST API, you will see a new section called “REST API.” Click on it.

- Add a New Key: Click Add Key button.

- Configure Your Key:
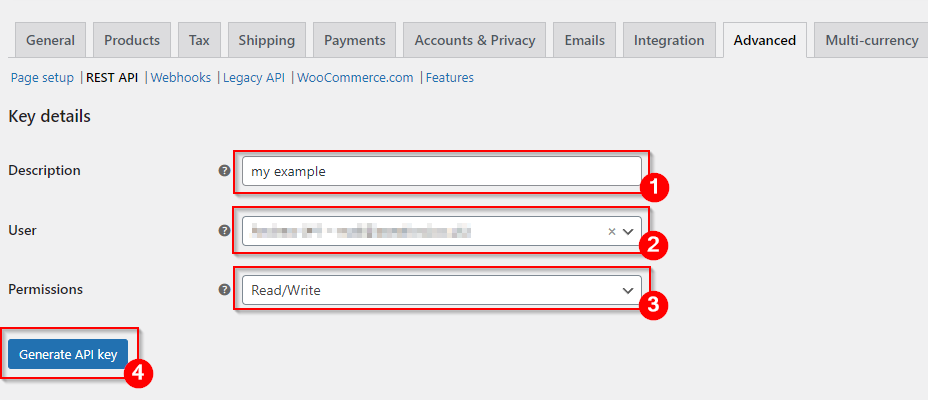
- Description: Give your key a name or description so you can recognize it later.
- User: Select your WordPress user account.
- Permissions: Choose the level of permissions you want for this API key. For API requests like creating products, “Read/Write” permissions are typically needed.
- Generate Key: After configuring the key details, click on “Generate API Key.”
- View Your Credentials: Once the key is generated, you will see your
consumer_keyandconsumer_secret. These are the credentials you will use in your Python script to authenticate with the WooCommerce REST API.Important: Make sure to copy and save yourconsumer_keyandconsumer_secretin a secure location. You won’t be able to view theconsumer_secretagain, so if you lose it, you’ll need to regenerate the API key.
Summary
Once you have your consumer_key and consumer_secret, you can use them in your external applications to make authenticated requests to your WooCommerce store’s REST API.