Author Archive

How To Find WooCommerce Consumer Key and Secret

Introduction

The WooCommerce Consumer Key and Secret enable external application to communicate with your WooCommerce store. The key and secret are an essential for authenticating requests to your WooCommerce store’s REST API.

Step by Step Guide

To obtain the consumer_key and consumer_secret for your WooCommerce store, you’ll need to create a set of API credentials. Here’s how you can do it:

  1. Access Your WooCommerce Dashboard: Log in to your WordPress admin dashboard where WooCommerce is installed.
  2. Navigate to WooCommerce Settings: In your WordPress admin, go to WooCommerce settings. You can usually find this under the WooCommerce tab in your WordPress sidebar.
  3. Go to the Advanced Tab: In the WooCommerce settings, click on the Advanced tab.
  4. Enable the REST API: Scroll down to the “REST API” section and make sure it’s enabled. If it’s not enabled, click the checkbox to enable it.
  5. Create a New API Key: After enabling the REST API, you will see a new section called “REST API.” Click on it.
  6. Add a New Key: Click Add Key button.
  7. Configure Your Key:
    • Description: Give your key a name or description so you can recognize it later.
    • User: Select your WordPress user account.
    • Permissions: Choose the level of permissions you want for this API key. For API requests like creating products, “Read/Write” permissions are typically needed.
  8. Generate Key: After configuring the key details, click on “Generate API Key.”
  9. View Your Credentials: Once the key is generated, you will see your consumer_key and consumer_secret. These are the credentials you will use in your Python script to authenticate with the WooCommerce REST API.Important: Make sure to copy and save your consumer_key and consumer_secret in a secure location. You won’t be able to view the consumer_secret again, so if you lose it, you’ll need to regenerate the API key.

Summary

Once you have your consumer_key and consumer_secret, you can use them in your external applications to make authenticated requests to your WooCommerce store’s REST API.

Containerize An Inno Installed Application

Introduction

In this article, we are going to create a Docker Image from an Inno Installer. The installer will install a .net 4.8 framework console application into the docker image.

Typically, when building docker images you should try to build the image from the source code but in the real world this is not always possible and in this article, we will assume that you do not have access to the source code for the installer or the console application that this being installed.

We will be using an installer called mysetup.exe, which installs an application called HelloWorldConsole.exe to the folder c:\program files (x86)\My Program\.

Containerize Procedure

In this procedure, we are going to create a Docker Image that will execute the installer and configure the container to run the application HelloWorldConsole.exe on startup.

  1. In the same folder as the installer mysetup.exe create a text file called Dockerfile.
  2. Using a text editor add the following code to the Dockerfile.
    FROM mcr.microsoft.com/dotnet/framework/runtime:4.8
    WORKDIR /app
    COPY mysetup.exe
    RUN mysetup.exe /VERYSILENT
    ENTRYPOINT ["/program files (x86)/My Program/HelloWorldConsole.exe"]
  3. Open the command prompt and navigate to the folder containing the Dockerfile and execute the command to create the docker image. The command will create a new docker image called installhelloworldconsole.
    docker image build --tag installhelloworldconsole .
  4. To create a container using the image run the command docker run. This command will create a container using the image created in the previous step and call the container hello2.
    docker run --name hello2 installhelloworldconsole
  5. After the container has booted, the container will execute the program c:\program files (x86)\My Program\HelloWorldConsole.exe
  6. You can confirm the program has been executed by checking the docker logs using the command docker logs and the name of the container.
    docker logs hello2

Summary

In this article, we create a docker container using a pre-existing installer.

Containerize .net Framework 4.8 Console Application

Introduction

In this article, we are going to create a Docker Image for a .net framework console application. The Docker Image will enable us to execute the console application within a Docker Container.

The Console Application

The console application that we will be using is called HelloWorldConsole.exe. When executed from the command line the application displays “Hello World”.

The application is a C# (c sharp) program that has been compiled using .net framework 4.7 and here is the source code for the application which we will be using within this article. Although in this article we will only be using the compiled application.

using System;

namespace HelloWorldConsole
{
    internal class Program
    {
        static void Main()
        {
            Console.WriteLine("Hello World");
        }
    }
}

Containerizing Procedure

In this procedure, we are going to create a Dockerfile. The file will describe how to create the Docker Image for the console application HelloWorldConsole.exe.

  1. In the same directory as the HelloWorldConsole.exe application create a text file called Dockerfile no extension.
  2. Using a text editor add the following code to the Dockerfile
    FROM mcr.microsoft.com/dotnet/framework/runtime:4.8
    WORKDIR /app
    COPY . .
    ENTRYPOINT ["/app/HelloWorldConsole.exe"]
  3. Open a command prompt and change the directory to the folder containing the Dockerfile
  4. Execute the docker command to build the image file. The command will create a new docker image called helloworldconsole. Docker image names are all lowercase. The full stop (period) at the end of the command is very important as this informs the command to look for the Dockerfile in the current working directory.

    docker image build --tag helloworldconsole .

  5. Execute the docker command to run the container using the image built in the previous step. The name argument will give set the container name to hello1 and helloworldconsole is the name of the image that will be used to create the container.

    docker run --name hello1 helloworldconsole

    There will be a short delay while the container boots and then the container will execute the HelloWorldConsole.exe console application.

  6. The output from the console application will be stored in the docker logs. You can review the log messages by using the docker log command with the name of the container.

    docker logs hello1

  7. The container hello1 can be stopped using the cocker stop command with the name of the container. To confirm the container has stopped execute the command docker container ls command.

    docker stop hello1

    docker container ls


Summary

In this article, we created a Docker image called helloworldconsole. Then using the image helloworldconsole we created a docker container called hello1. The container executed the console application HelloWorldConsole.exe. We viewed the output of the console application using docker logs and then stopped the container using the command docker stop.

How To Use Extension Methods in C#

Extension Methods can extend any type with additional methods
Extension Methods requirements:

  • Class must be static
  • The function must be static
  • The function must use ‘this’ in the arguments to denote the type that is being extended.
using System;

namespace ExtensionMethodExample
{
    internal class Program
    {
        static void Main()
        {
            string hello = "Hello";
            Console.WriteLine(hello.Shout());

            Console.WriteLine("Press any key to exit");
            Console.ReadKey();
        }
    }

    public static class StringExtensions
    {
        public static string Shout(this string message)
        {
            return message.ToUpper();
        }
    }
}

How To Change The Label Font in TKinter

The font attribute of the label widget can be used to change the font style and size.

First, we will create a window with a label using the default font and size.

import tkinter as tk

win = tk.Tk()
win.geometry("750x450")

title_label = tk.Label(win, text="hello")
title_label.pack(pady=10)

win.mainloop()

Below is the window with the label’s default font and style.

Next, we will add the font attribute to the label widget to customize the font style and size. In this example, we are going to change the font style to “Impact” and the font size to 20. The possible font styles are listed on the page https://learn.microsoft.com/en-us/typography/font-list/.

import tkinter as tk

win = tk.Tk()
win.geometry("750x450")

title_label = tk.Label(win, text="hello", font= 'Impact 17')
title_label.pack(pady=10)


win.mainloop()

Below is the output with the label’s customized font style and size.

Displaying An Image With Python Tkinter

The aim of the tutorial is to display an image using Tkinter. The image will change when a button is pressed.

Step 1

Create the Tkinter window.

import tkinter as tk

win = tk.Tk()
win.geometry("750x450")

win.mainloop()

When executed the code should generate a window 750 by 450.

TK window

Step 2

Display the image in the window. The code will load the image into a variable called photo. The code then adds a Label to the window of the type image and populates the label with the photo. In this example, the image is called car-jump.gif and the python code will assume the image file is in the same directory as the python code.

import tkinter as tk

win = tk.Tk()
win.geometry("750x450")

photo = tk.PhotoImage(file='car-jump.gif')
image = tk.Label(win, image=photo)
image.pack()

win.mainloop()

When executed the code will create a window with an image.

Step 4

Add a button to the window. First, we are going to add a button to the window and confirm the button will print a message when clicked. In the next step, we will link the button to the image.

import tkinter as tk


def change_image():
    print("Button has been clicked")


win = tk.Tk()
win.geometry("750x450")

photo = tk.PhotoImage(file='car-jump.gif')
image = tk.Label(win, image=photo)
image.pack()

button = tk.Button(win, text="Click to change image", command=change_image)
button.pack()

win.mainloop()

When executed the window should show the image and a button.

Tk window with image and button

In the console window, you should see the message “Button has been clicked”, every time the button has been clicked.

Step 5

In this step we will add the code to the change_image function that will change the image from car to a flower. In this example, the code assumes the flower.gif file will be in the same folder as the python code.

import tkinter as tk


def change_image():
    global show_car, image
    filename = 'not set'
    if show_car:
        filename = 'car-jump.gif'
        show_car = False
    else:
        filename = 'flower.gif'
        show_car = True
    print("Setting image to " + filename)
    photo2 = tk.PhotoImage(file=filename)
    image.configure(image=photo2)
    image.image = photo2


win = tk.Tk()
win.geometry("750x450")

photo = tk.PhotoImage(file='car-jump.gif')
image = tk.Label(win, image=photo)
image.pack()

button = tk.Button(win, text="Click to change image", command=change_image)
button.pack()

show_car = False
win.mainloop()

When executed the code will show the car image.

When the button is clicked the image will change to a flower.

Ubuntu 12.4 Enable SSH Service

To install the openssh-server package run the command below in console.

sudo apt-get install openssh-server

Once installed, the SSH service should start automatically. If necessary, you can start the service using the command.

sudo service ssh start

Z Axis drops after completing job

Symptoms
CNC machine Z Axis drops after completing job.

Relevant
Marlin 3D Printer Firmware running on Arduino Mega with RAMPS 1.4 shield. Controlled via Pronterface.

Procedure
The steppers motors will shut down DEFAULT_STEPPER_DEACTIVE_TIME seconds after the last move when DISABLE_INACTIVE_? is true. Individual axis can be disabled or DEFAULT_STEPPER_DEACTIVE_TIME can be set to zero to stop the axis from dropping.

  1. Open the firmware project
  2. Open file Configuration_adv.h
  3. Change the line from

    #define DEFAULT_STEPPER_DEACTIVE_TIME 120

    to

    #define DEFAULT_STEPPER_DEACTIVE_TIME 0
  4. Upload firmware project

Reporting endstop status

Symptoms
CNC machine reports incorrect end stop trigger.

Relevant
Marlin 3D Printer Firmware running on Arduino Mega with RAMPS 1.4 shield. Controlled via Pronterface.

Procedure
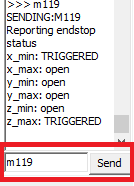
The status of the end switches can be checked using the command M119. The procedure below explains how to check the status of the switches.

  1. Click the Connect button


  2. Enter the command M119 and then click the Send button. The command will display the status of each of the end switches.

Simple Box G Code

Goal
The goal of this procedure is to draw a simple box 10x10mm.

Relevant
Marlin 3D Printer Firmware running on Arduino Mega with RAMPS 1.4 shield. Controlled via Pronterface.

Procedure
The procedure below is a simple gcode example that will show how to draw a simple 10mm box.

  1. Create a text file with the following code. In this example, we will call the text file box10x10mm.g

    G91
    G1 X10
    G1 Y10
    G1 X-10
    G1 Y-10
  2. Open Pronterface
  3. Click the Connect button, to connect to the device.

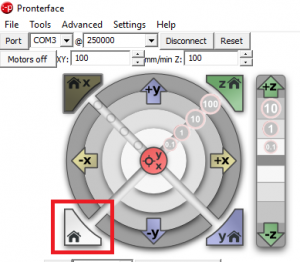
  4. Click the Home button, to home all of the axis.

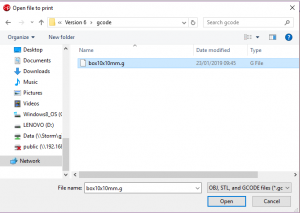
  5. Click the Load File button.
  6. Select the file created in step 1.
  7. Click the Print button.